Help & how-to
How to use Daily Diary Log
Step-by-step help in plain words, with pictures of each screen. The green numbers on the pictures match the numbered steps. Start at the top, or jump straight to what you need.
Capture now, tidy later.
To save an entry, all you need is one interest, such as Fishing. The words, photos, date and tags can all be added or changed afterwards, whenever it suits you.
Use it on your phone, tablet, laptop or PC. Sign in with the same email on each, and your whole diary is there.
Snap a quick photo on your phone, choose one interest and tap Save Entry. Then finish the words later, wherever suits you, such as on the big screen at home.
Tip: save first. A half-written entry that hasn't been saved stays on the device you started it on.
- Getting started
- Adding an entry
- Finding things
- Changing things
- Your interests and tags
- Your diary, your data
- Common questions
- Still stuck?
Getting started
Signing in
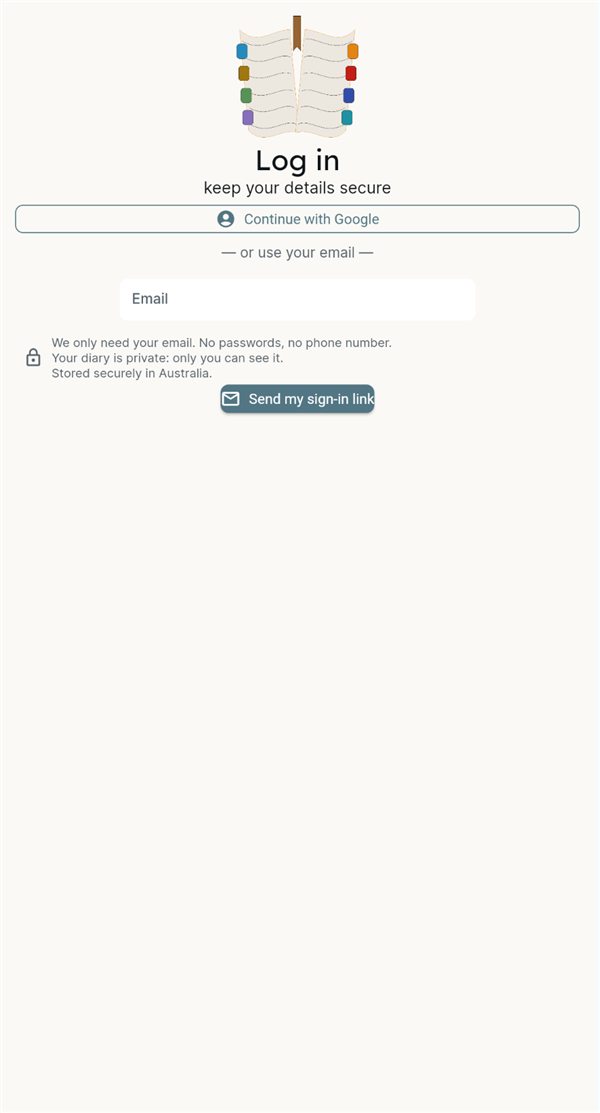
Open the app. Use the Open the app button at the top of this page.
Tap Continue with Google if you use Gmail. That's the quickest way.
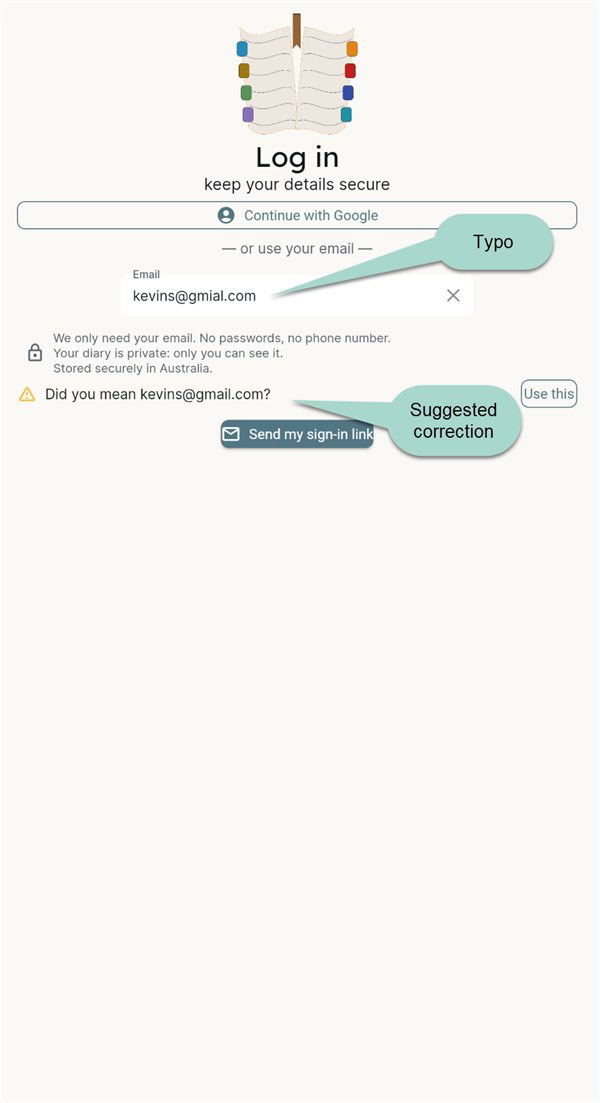
Or type your email address and tap Send my sign-in link.
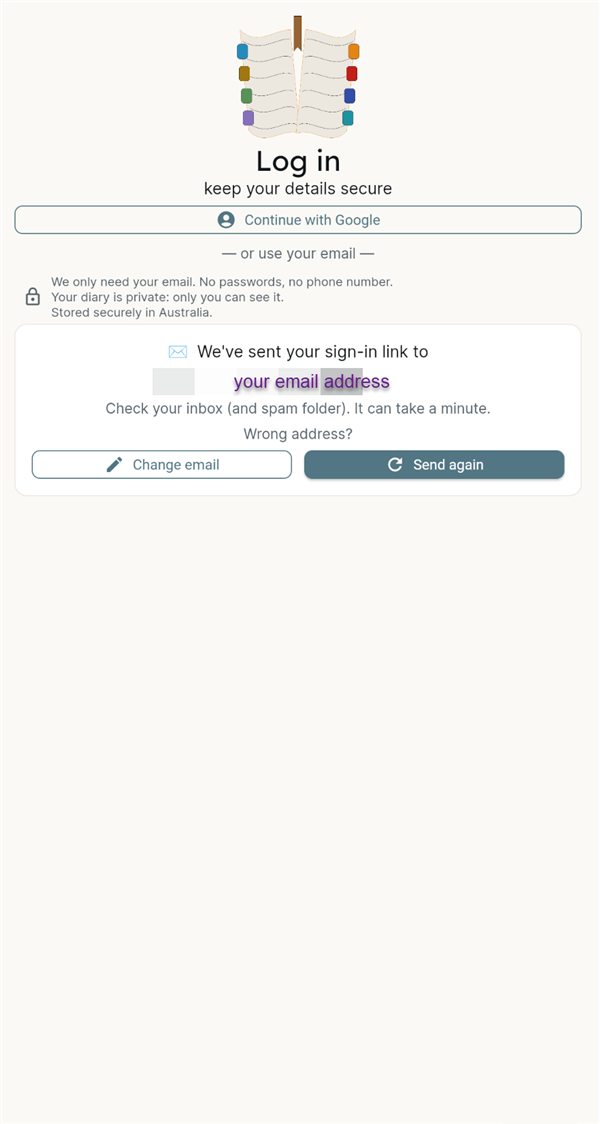
Open the email we send you and tap Sign in by clicking here. You're in.
There's no password to remember.
Easier to type than to tap? The email also shows a 6-digit code. Copy it, go back to the sign-in page, paste it into the code box and tap Sign in with code.
The first time you sign in
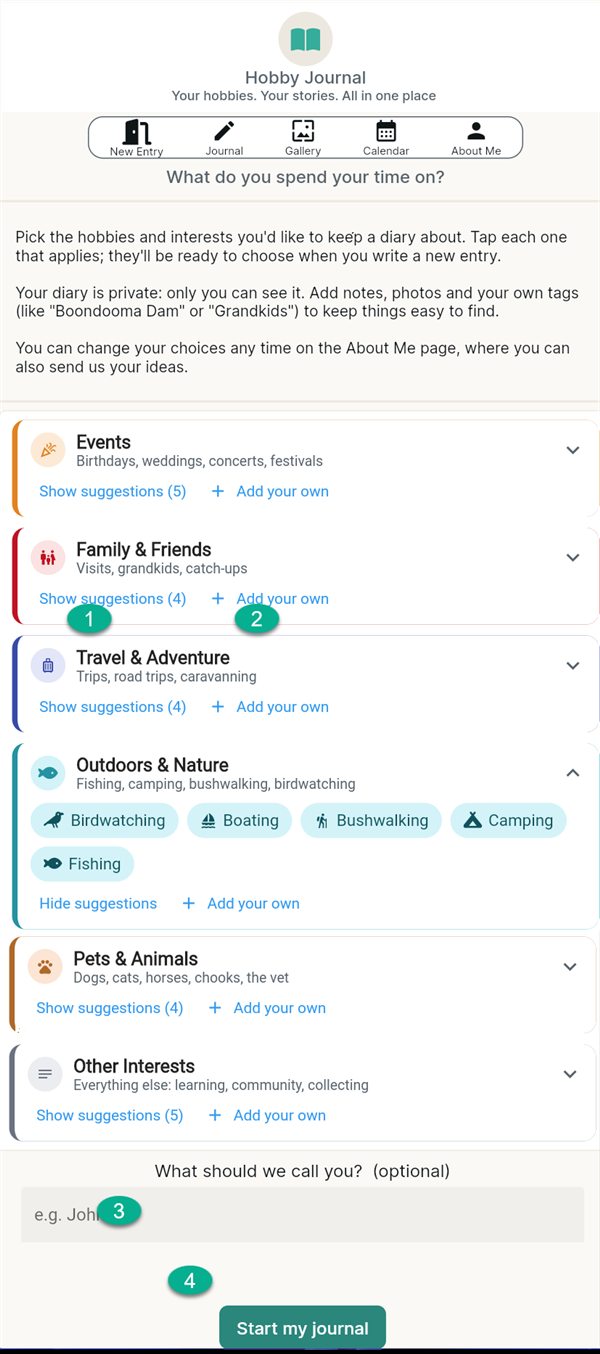
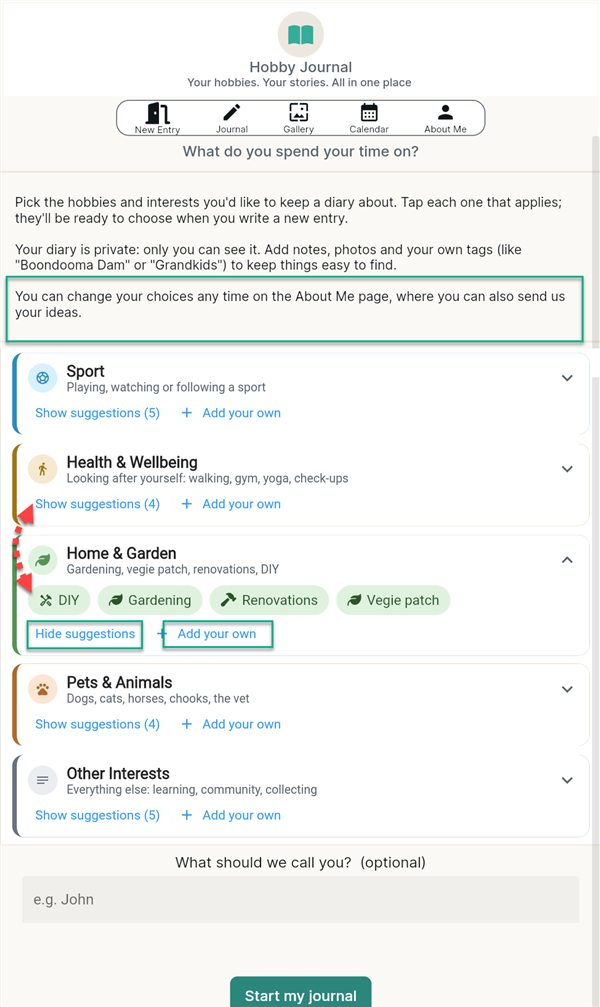
Each coloured category shows some ideas. Tap Show suggestions, then tap the interests you enjoy, such as Fishing or Gardening.
Something not there? Tap + Add your own and type it in.
Type what you'd like to be called, if you like. It's used for your greeting.
Tap the Start my journal bar at the bottom of the screen.
You can change all of this any time on the About Me page.
Your diary starts empty
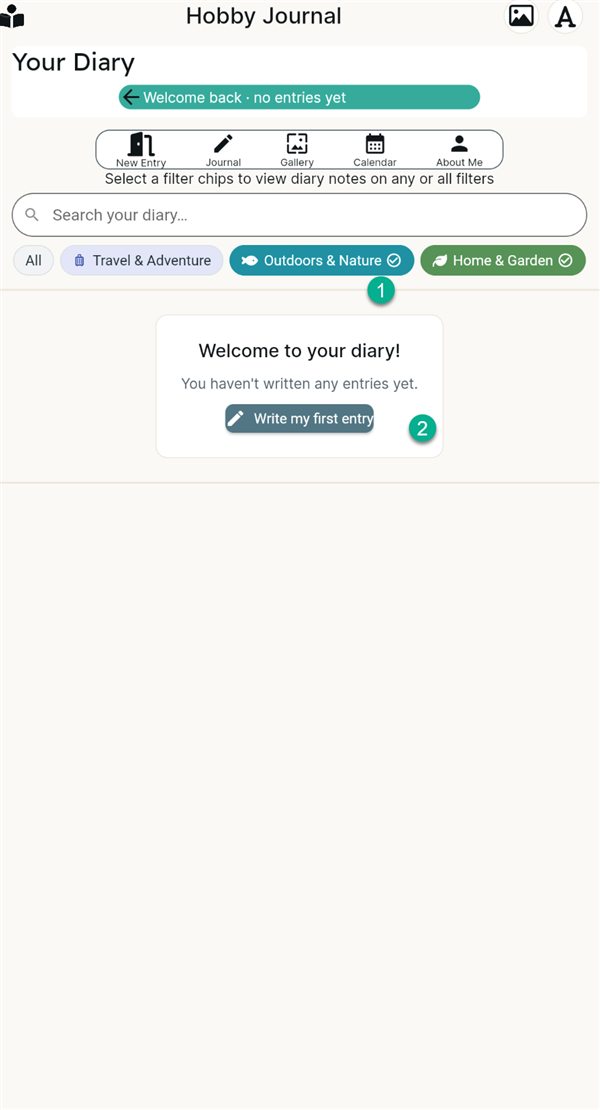
The categories you chose appear as coloured buttons along the top of your Journal.
Tap Write my first entry (or New Entry in the menu) to begin.
The menu
Every page has the same menu: New Entry Journal Gallery Calendar About Me. Tap one to go there.
Put it on your phone's home screen
Open the app once, then:
- Android (Chrome): tap ⋮ → Add to Home screen
- iPhone (Safari): tap Share → Add to Home Screen
It then opens like any other app, with no address to type.
Adding an entry
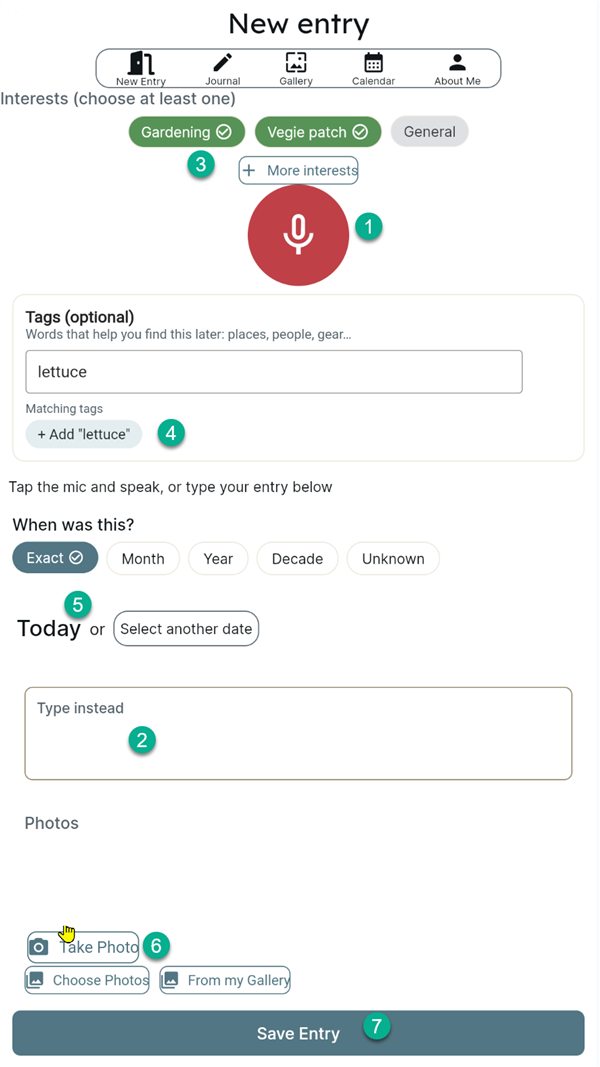
Tap New Entry in the menu. Only step 3 is a must. Everything else can wait.
Say it: tap the red microphone at the bottom of the screen, beside Save Entry, and talk. Tap it again to stop.
The first time, your phone may ask to use the microphone. Tap Allow.
Or type it in the Type instead box.
Choose at least one interest by tapping its coloured button. It shows a tick when chosen.
Can't see the one you want? Tap + More interests. As you write, the app may suggest one, for example Sounds like: + Fishing. Tap it to add it.
Tags (optional): words that help you find it later, such as a place, a person or some gear. Type one, then tap + Add.
When was this? It starts on Today. For another day, tap Select another date.
Not sure of the exact day? Choose Month, Year, Decade or Unknown. Handy for old photos.
Add photos, up to 8 per entry:
- Take Photo uses your camera (phones and tablets)
- Choose Photos picks from your phone or computer
- From my Gallery reuses a photo already in your diary
Tap Save Entry. It stays at the bottom of the screen, just above the keyboard, so you never have to scroll to find it. Done.
Lost signal? Your words are safe.
While you write, the app keeps a draft on your phone ("✓ Draft saved on this phone"). Next time you open New Entry, tap Carry on to pick up where you left off, or Start fresh.
Something coming up?
Give an entry a future date, such as a birthday or a trip. It waits in the Upcoming list on your Journal page, above your entries, then becomes a memory on the day.
Finding things
Journal: all your entries
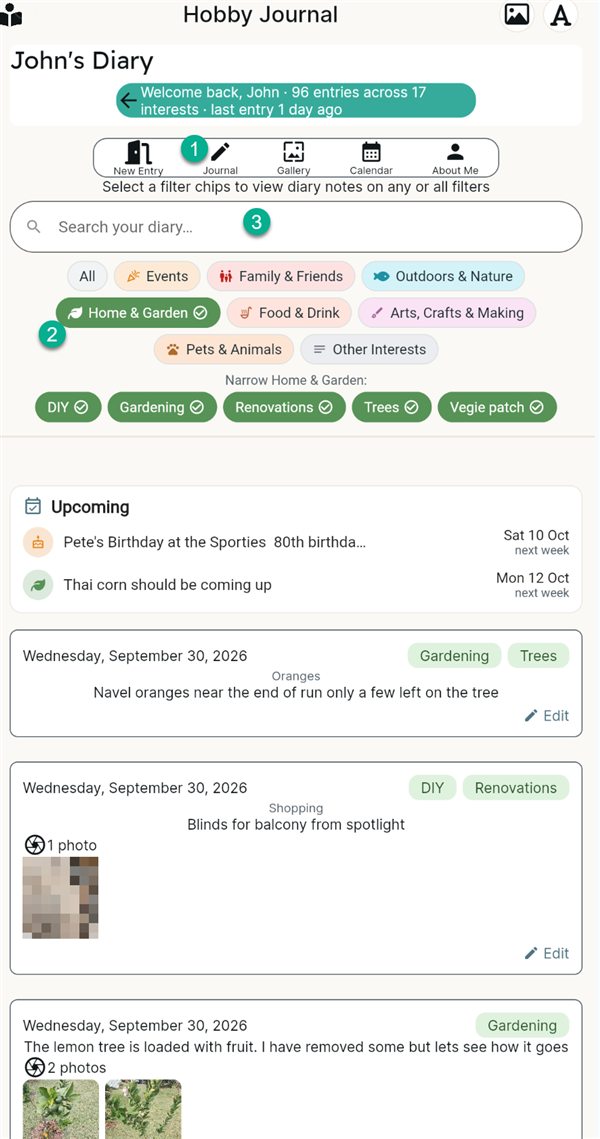
Tap Journal in the menu. Your entries are listed newest first, with anything coming up in the Upcoming list above them.
Tap a coloured button to see just that category, such as Home & Garden. Then tap the interests under Narrow… to narrow it down further.
Tap All to see everything again.
Or type any word in Search your diary…, such as a place or a name. Prefer to talk? Tap the microphone in the search box and say it.
Gallery: all your photos
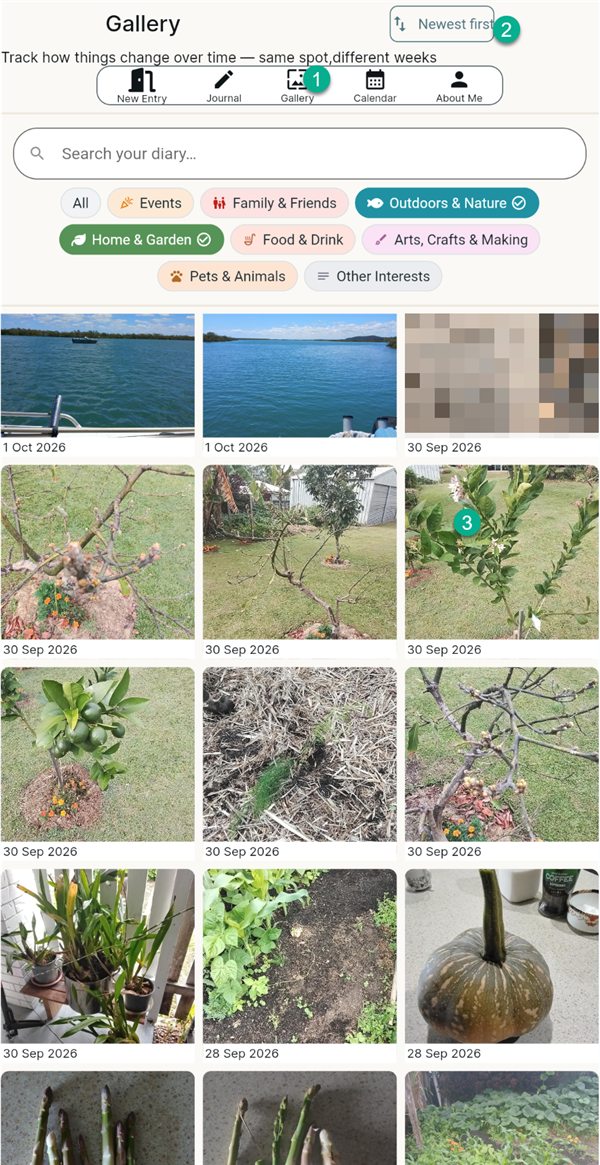
Tap Gallery in the menu to see every photo at once.
Tap Newest first to switch to Oldest first and back.
The colour buttons and search work just like in the Journal.
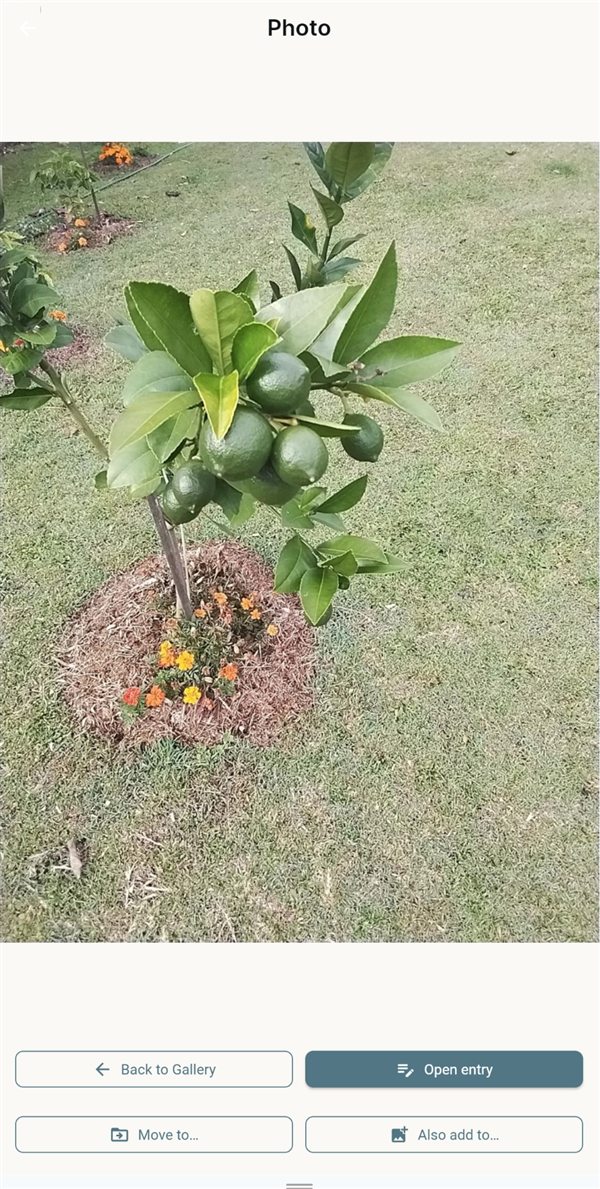
Tap a photo to see it full size. Open entry takes you to the entry it belongs to.
If the entry has more than one photo, swipe left or right (or tap the arrows) to see the others.
Calendar: month by month
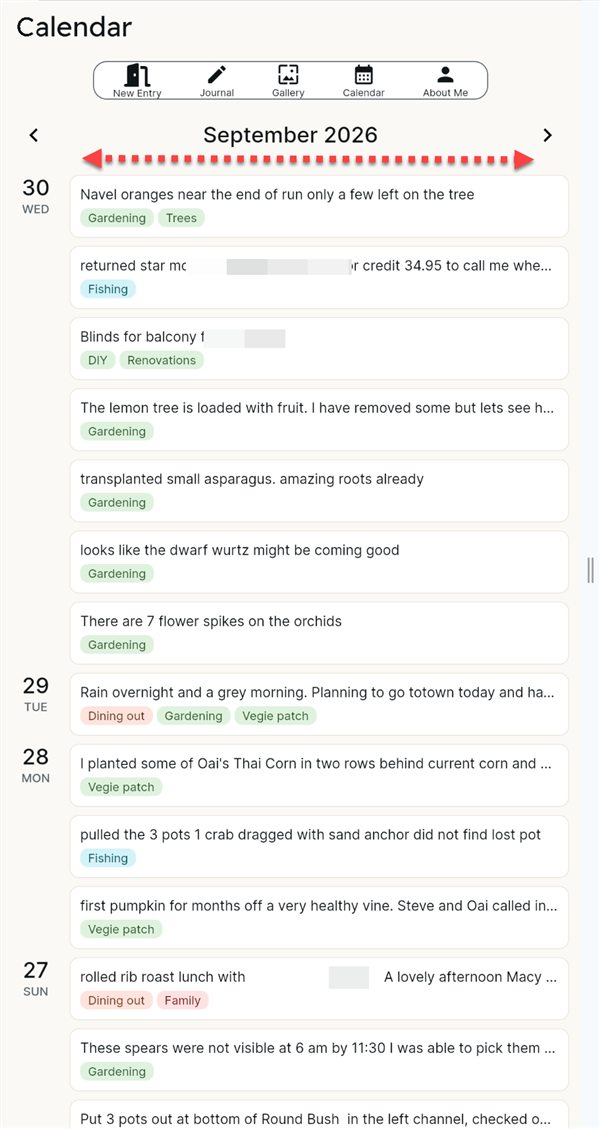
Tap Calendar in the menu. It shows this month, day by day.
Tap ‹ or › beside the month to go back or forward a month.
Tap an entry to open it.
Looking for something older? Type a word, or tap the microphone and say it, in the search box at the top. Entries from every month appear, newest first. Tap one to open it, and tap the x to go back to the months.
Changing things
Editing an entry
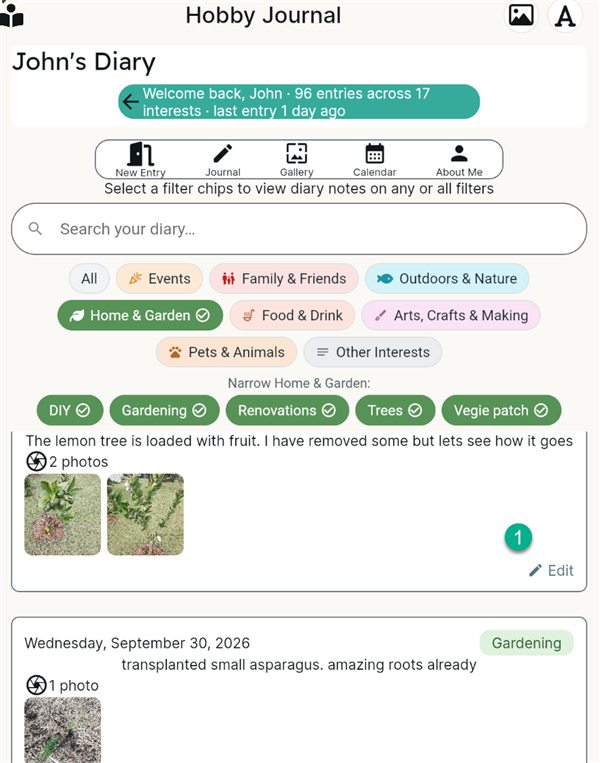
In the Journal, tap anywhere on the entry (look for ✎ Edit).
Change the words (the microphone works here too), interests, tags, date or photos.
Tap Save Entry.
On the Edit Entry page
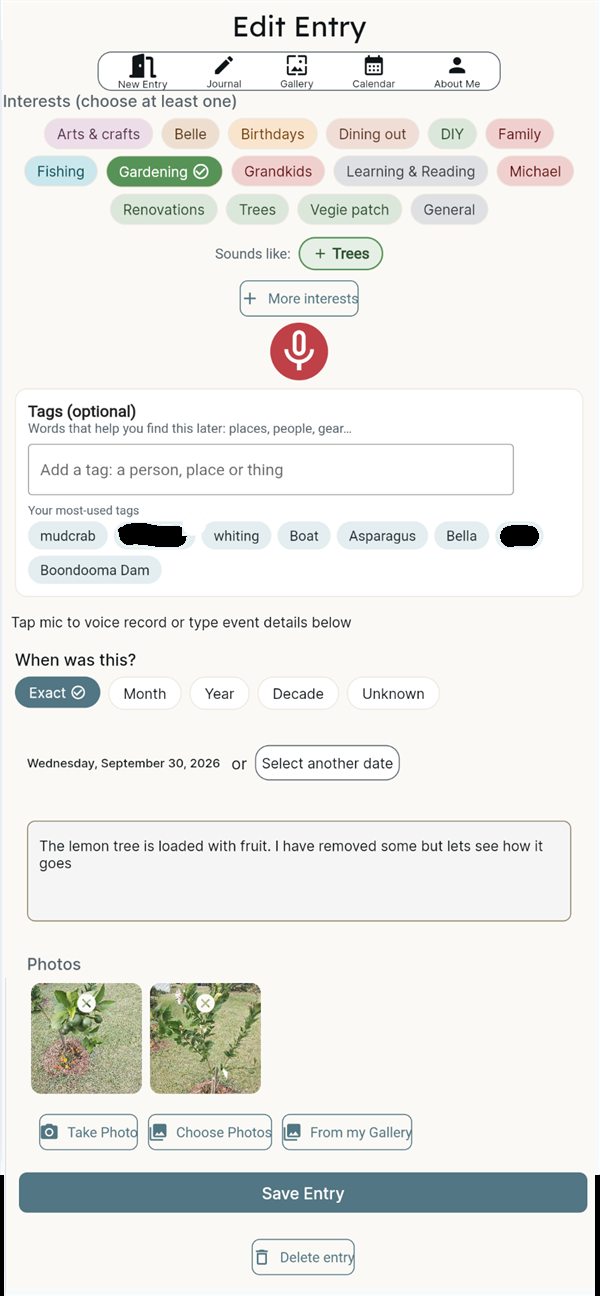
- Remove a photo: tap the ✕ on it, then confirm Remove this photo? It goes when you tap Save Entry.
- Delete the whole entry: tap Delete entry at the bottom, then Yes, delete. Changed your mind? Tap Keep it.
- Your tags: your most-used tags are listed, so one tap adds them.
Moving a photo to another entry
Tap the photo in the Gallery or the Journal to see it full size. Swipe left or right to see the entry's other photos.
Tap Move to… to shift it to a different entry, or Also add to… to show it in both.
Pick the entry from the list. You can search it by word.
Your interests and tags
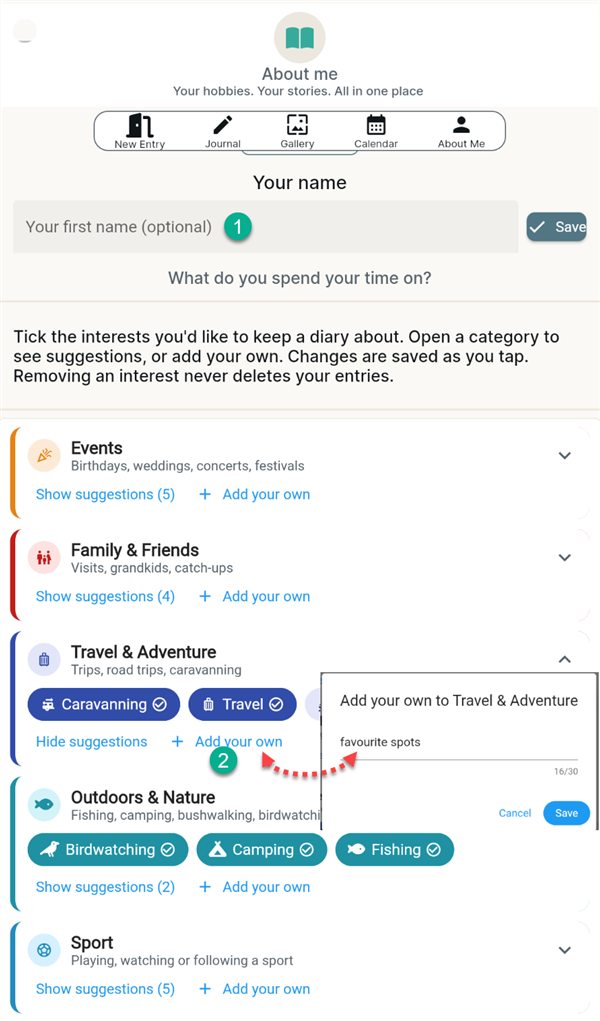
Everything about you lives on the About Me page.
Your name: type what the app calls you and tap Save.
Your interests: open a category and tick or untick interests. Changes are saved as you tap. Something missing? Tap + Add your own, type it and tap Save.
Removing an interest never deletes your entries.
Further down the same page:
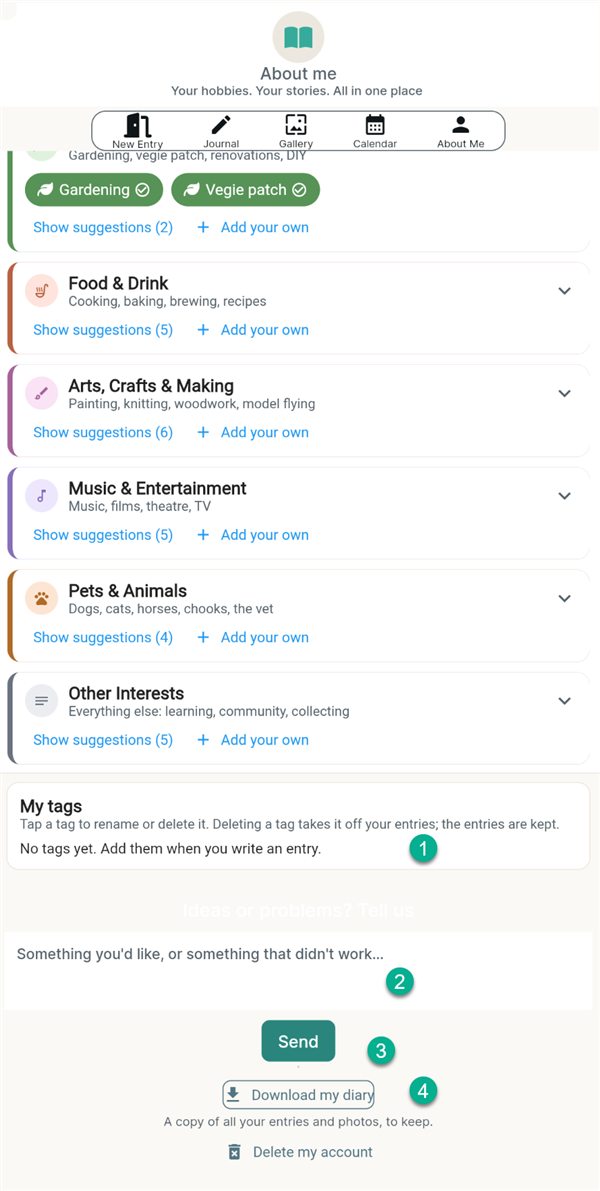
My tags: tap a tag to rename or delete it. Deleting a tag takes it off your entries; the entries are kept.
Ideas or problems? Tell us: type a message in the box…
…and tap Send. It comes straight to us.
Download my diary: see Your diary, your data below.
Your diary, your data
All on the About Me page.
Download my diary
Tap Download my diary (near the bottom) and keep the page open. A big diary can take a minute or two.
Find the download (usually in your Downloads folder) and unzip it first, so the photos show.
Inside: My diary.html (open it to read or print your whole diary), a spreadsheet, all your photos, and Read me first.txt.
Sharing a photo or an entry
A photo: tap the photo in the Gallery or Journal to see it full size, then tap Share this photo.
A whole entry: open the entry (tap it in the Journal), scroll to the bottom and tap Share this entry. It sends the date, your words and the photos. Your tags are not included.
Wait a moment while the photos get ready, then tap Send… and pick how to send it: email, WhatsApp, Messenger, Facebook or a text message.
A small line, "Kept with Daily Diary Log", is added at the end.
On a computer there may be no share menu. You then get Copy text, Download the photos and Write it in Gmail (words only) instead.
Nothing is posted for you and no public link is made. Anyone you send it to can keep a copy, so share only what you are happy for them to have. Some apps, such as Facebook, drop the words when you share a photo. If that happens, tap Copy text and paste them in.
- Delete my account (at the very bottom): permanently deletes your account and your whole diary. You'll be asked to type DELETE to be sure. Download a copy first if you want to keep it.
- Sign out (at the top): signs you out on this phone or computer. Your diary stays safe, ready for next time.
Common questions
I didn't get the sign-in email
- Wait a minute. It can take a little while to arrive.
- Look in your spam or junk folder.
- Check the address shown on screen. If it's wrong, tap Change email.
- Still nothing? Tap Send again.
- Using Gmail? Continue with Google skips the email altogether.
Can I sign in with a code instead of the link?
Yes. The sign-in email shows a 6-digit code as well as the Sign in by clicking here button. Copy the code, go back to the sign-in page, paste it into the code box and tap Sign in with code. It is handy if switching between your email and the app is awkward on your phone or tablet.
Codes work once and expire after a while. Tap Send again for a fresh one.
Can I send an entry to my family?
Yes. Open the entry, scroll down and tap Share this entry. You choose how to send it (email, WhatsApp, Messenger, a text message). It sends a copy of the date, your words and the photos; your diary itself stays private. You can also share a single photo from the full-size photo page.
It won't let me save
Every entry needs at least one interest, so you can find it later. Tap a coloured interest button so it shows a tick, then tap Save Entry again.
Nothing fits? Tap More interests, or choose General (under Other Interests) and change it later.
It says "You already have this photo"
The app noticed that photo is already in your diary, so you don't end up with copies. If you really do want it in this entry as well, tap Use the same photo.
Where's "Take Photo" on my computer?
Computers can't take photos through the app, so the button only shows on phones and tablets. On a computer, use Choose Photos to pick photos from your files.
The microphone isn't working
- Your phone or browser may have asked for permission to use the microphone. Make sure you chose Allow.
- Some browsers don't support talking instead of typing. Chrome (Android and computers) and Safari (iPhone) work best.
- You can always tap Type instead.
An entry can only have 8 photos?
Yes, 8 is the most per entry. It keeps entries quick to open. For a big day out, split it into two entries, such as "Morning" and "Afternoon".
Still stuck?
Send us an email and tell us what happened. A photo of the screen helps a lot.
Ideas for making the app better? Use the Ideas or problems? Tell us box on the About Me page, or email us. We read every message.
Email link not opening your email program? or write it in Gmail.
Testing the app for us? Tell us how it's going on the tester page.